Launching a private-label RC car is not simply about choosing a model from a catalog and adding a logo. It is a structured development project that moves through defined stages: concept definition, design engineering, prototyping, testing, and mass production. Whether you are a distributor expanding a product line, a hobby shop building a house brand, or a brand owner commissioning a unique platform, understanding each stage reduces risk and shortens time to market.
Before committing to a project scope, decide which route fits your budget and market timeline. There are two primary paths.
Route 1: Custom Graphics on an Existing Platform. You select a proven chassis and body mold, then apply your own artwork, color scheme, and branding. No new tooling is required. This ro
ute is the fastest and most cost-effective way to enter the market with a branded product. Minimum order quantities typically start at 200 units, enough to justify a dedicated paint and print run.
Route 2: New Body Shell Development. You develop an entirely new body shape, either from a 3D CAD file or by scanning a physical model. This route offers complete creative control but requires investment in precision steel molds for vacuum-forming polycarbonate shells. Because the mold is the primary capital cost, MOQs are considerably higher—often 1,000 units or more.
The table below summarizes the key differences.
Factor | Custom Graphics on Existing Model | New Body Shell Development |
Tooling investment | None | High (customer-owned mold) |
Typical MOQ | 200 units | 1,000+ units |
Development time | Weeks | Several months |
Design freedom | Limited to graphics and color | Full shape and style control |
Best for | Market testing, fast launches | Exclusive brand products |
The brief should specify the vehicle category (buggy, truggy, monster truck, crawler, on-road), the target scale (1/8, 1/10, 1/18, or other), the intended retail price band, and the key performance expectations.
For OEM projects, one detail deserves particular attention: the chassis platform. If you plan to build on an existing platform, confirm that the chosen platform matches your market position. A 1/10 scale brushless RC car may appeal to hobbyists seeking upgrade potential, while a 1/18 scale brushed model suits entry-level buyers. The development brief should state whether the project is a fresh design or a variant of an existing chassis.
Include in the brief:
Target scale and vehicle category.
Chassis type (existing platform or new).
Motor and ESC configuration (brushed or brushless).
Battery type and connector standard.
Body shell requirements (graphics-only or new shape).
Packaging format and branding assets.
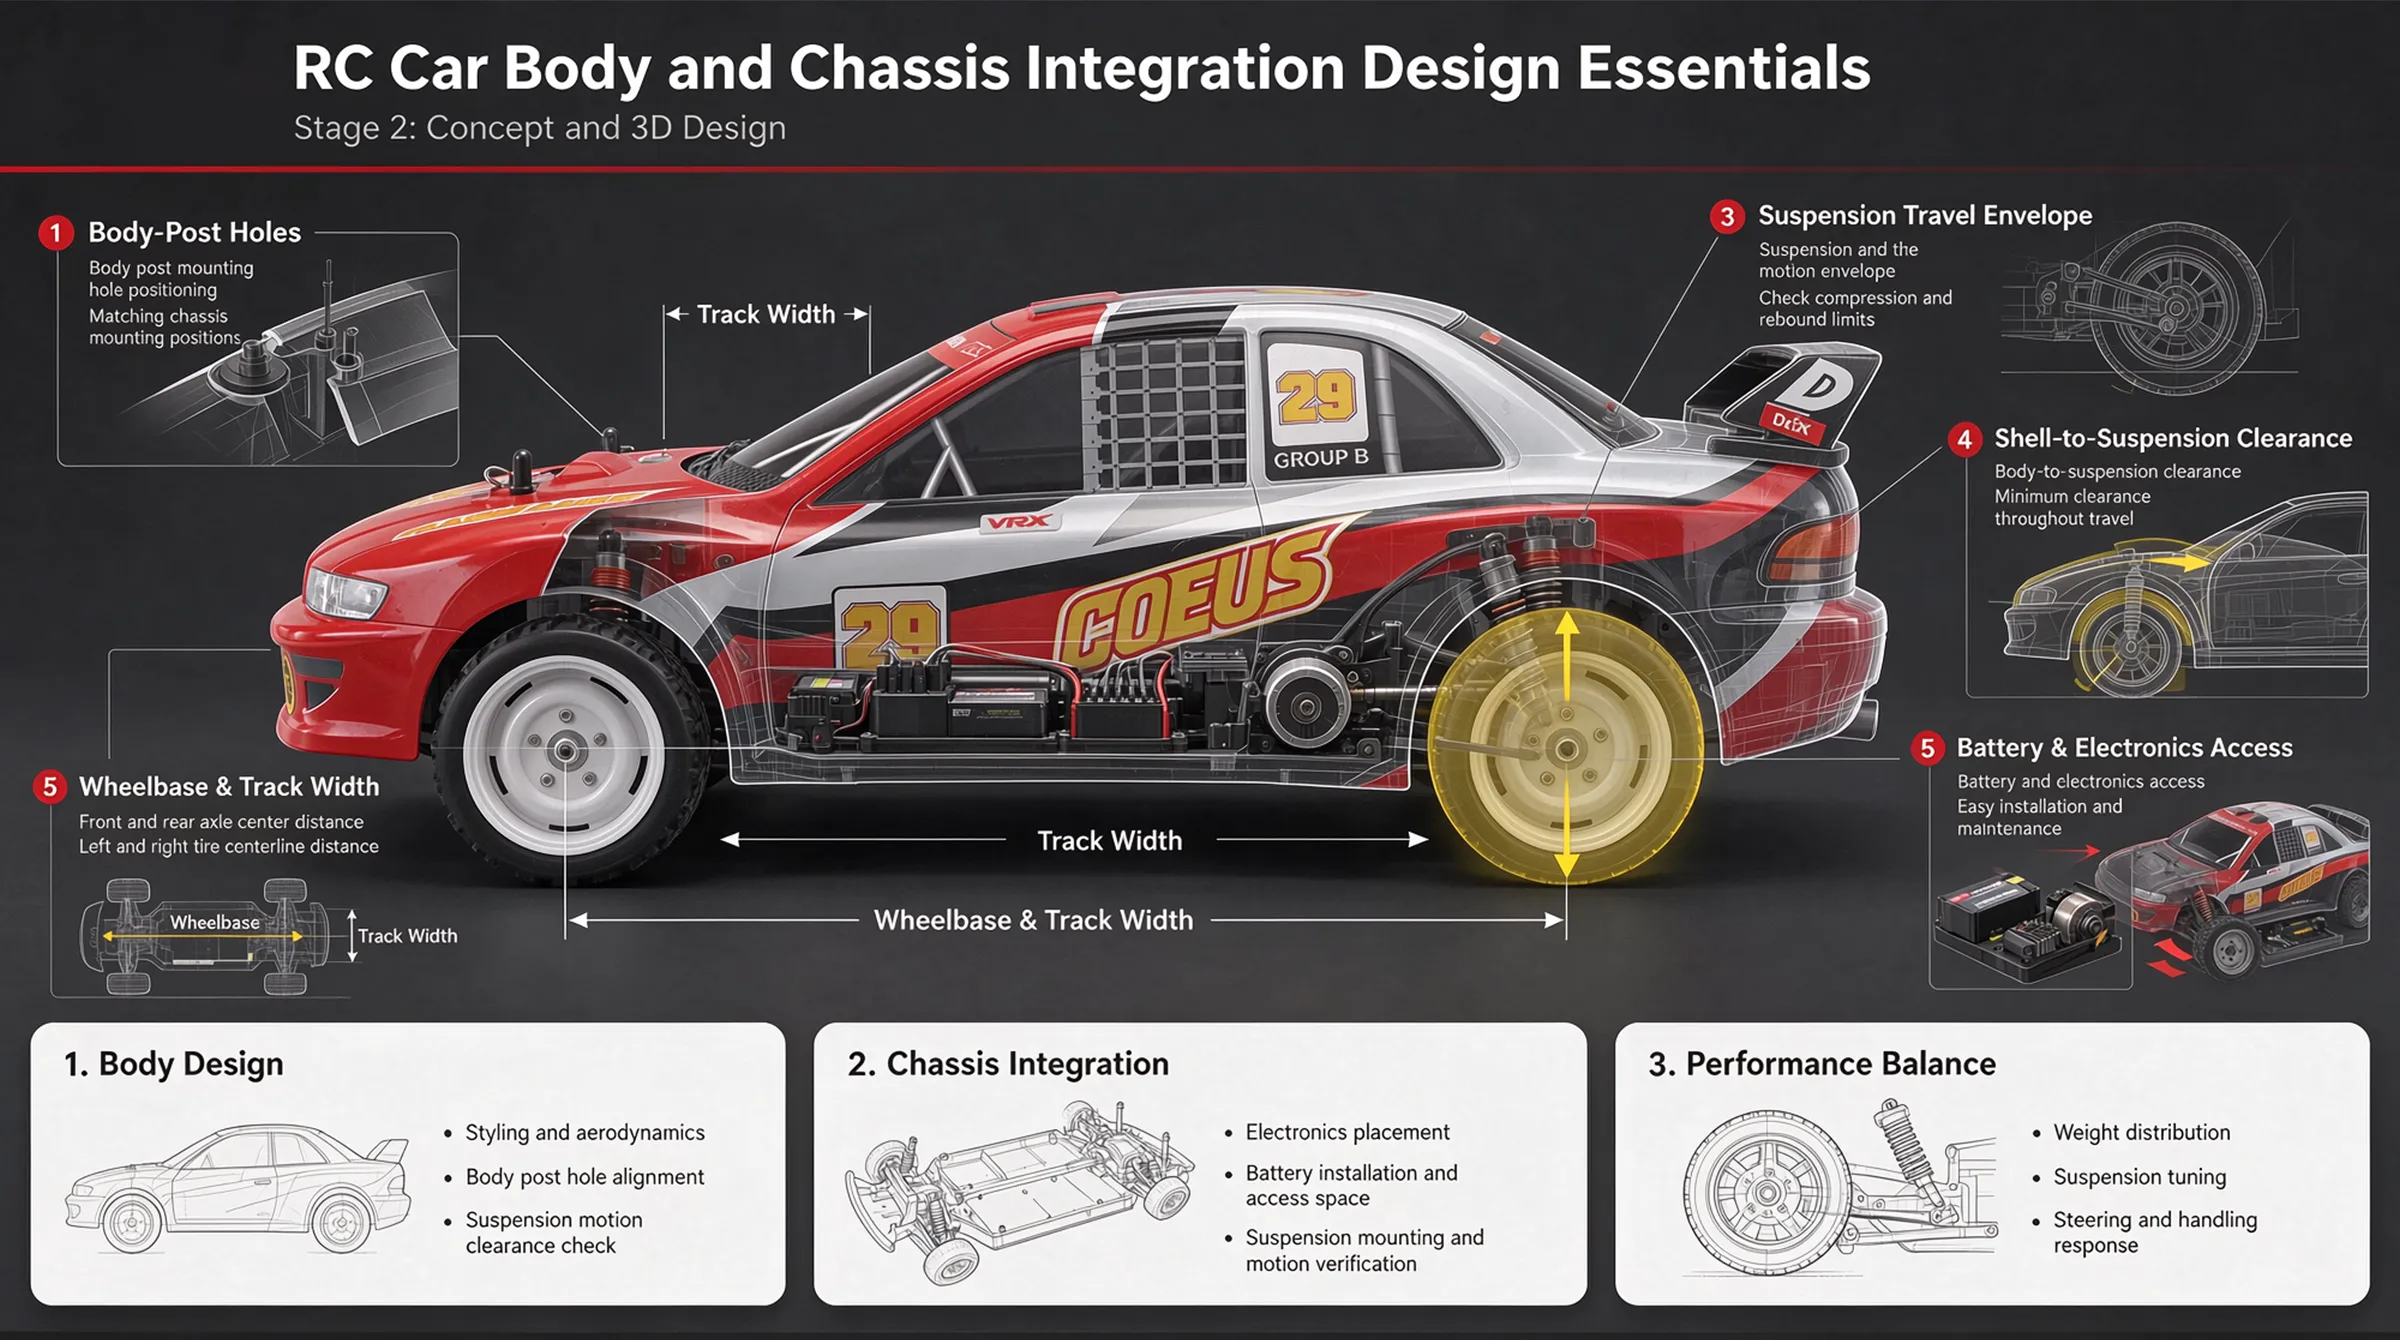
Once the brief is approved, the project moves into design. For a new body shell, this stage requires a detailed 3D CAD file. If you only have a physical prototype or hand-made model, the manufacturer can use 3D scanning—also called reverse engineering—to produce the required digital geometry. This service usually incurs an additional cost.
For chassis-level OEM projects, the CAD model must also incorporate:
Wheelbase and track width references.
Body-post hole locations.
Suspension travel envelopes.
Battery and electronics access paths.
Reviewing these factors during the concept stage avoids rework later.
Tooling is the most capital-intensive stage of a new body shell project. A high-precision steel mold is machined from the approved 3D design. This mold is then used to vacuum-form polycarbonate sheets into the final shell shape.
The mold belongs to the customer who commissions it, and the mold fee is a separate line item from unit production costs. This is why MOQ thresholds for new shells are significantly higher than for graphics-only customization.
For chassis components and structural parts, the tooling scope expands to include injection molds for plastic parts, die-casting tools for metal components, and CNC machining fixtures.
After the mold is complete, the factory produces initial samples. These are not final products. They are trial components used to evaluate fit, finish, and function.
A trial-mold prototype typically reveals issues that are invisible on a screen: slight dimensional variances, uneven material distribution in deep recesses, or interference between the shell and suspension arms. The engineering team should subject the prototype to both bench testing and field testing.
Bench testing checks:
Chassis-to-body fit and mounting alignment.
Wheel and tire clearance through full suspension travel.
Steering range without rubbing.
Electronics access and wiring routing.
Field testing checks:
Vibration resistance during normal driving.
Shell durability under impacts and rollovers.
Thermal behavior of motor and ESC within the enclosed body.
Test results inform design adjustments and, if necessary, tooling modifications. Each revision cycle adds time, so it is worth investing in thorough first-round testing rather than rushing to mass production.
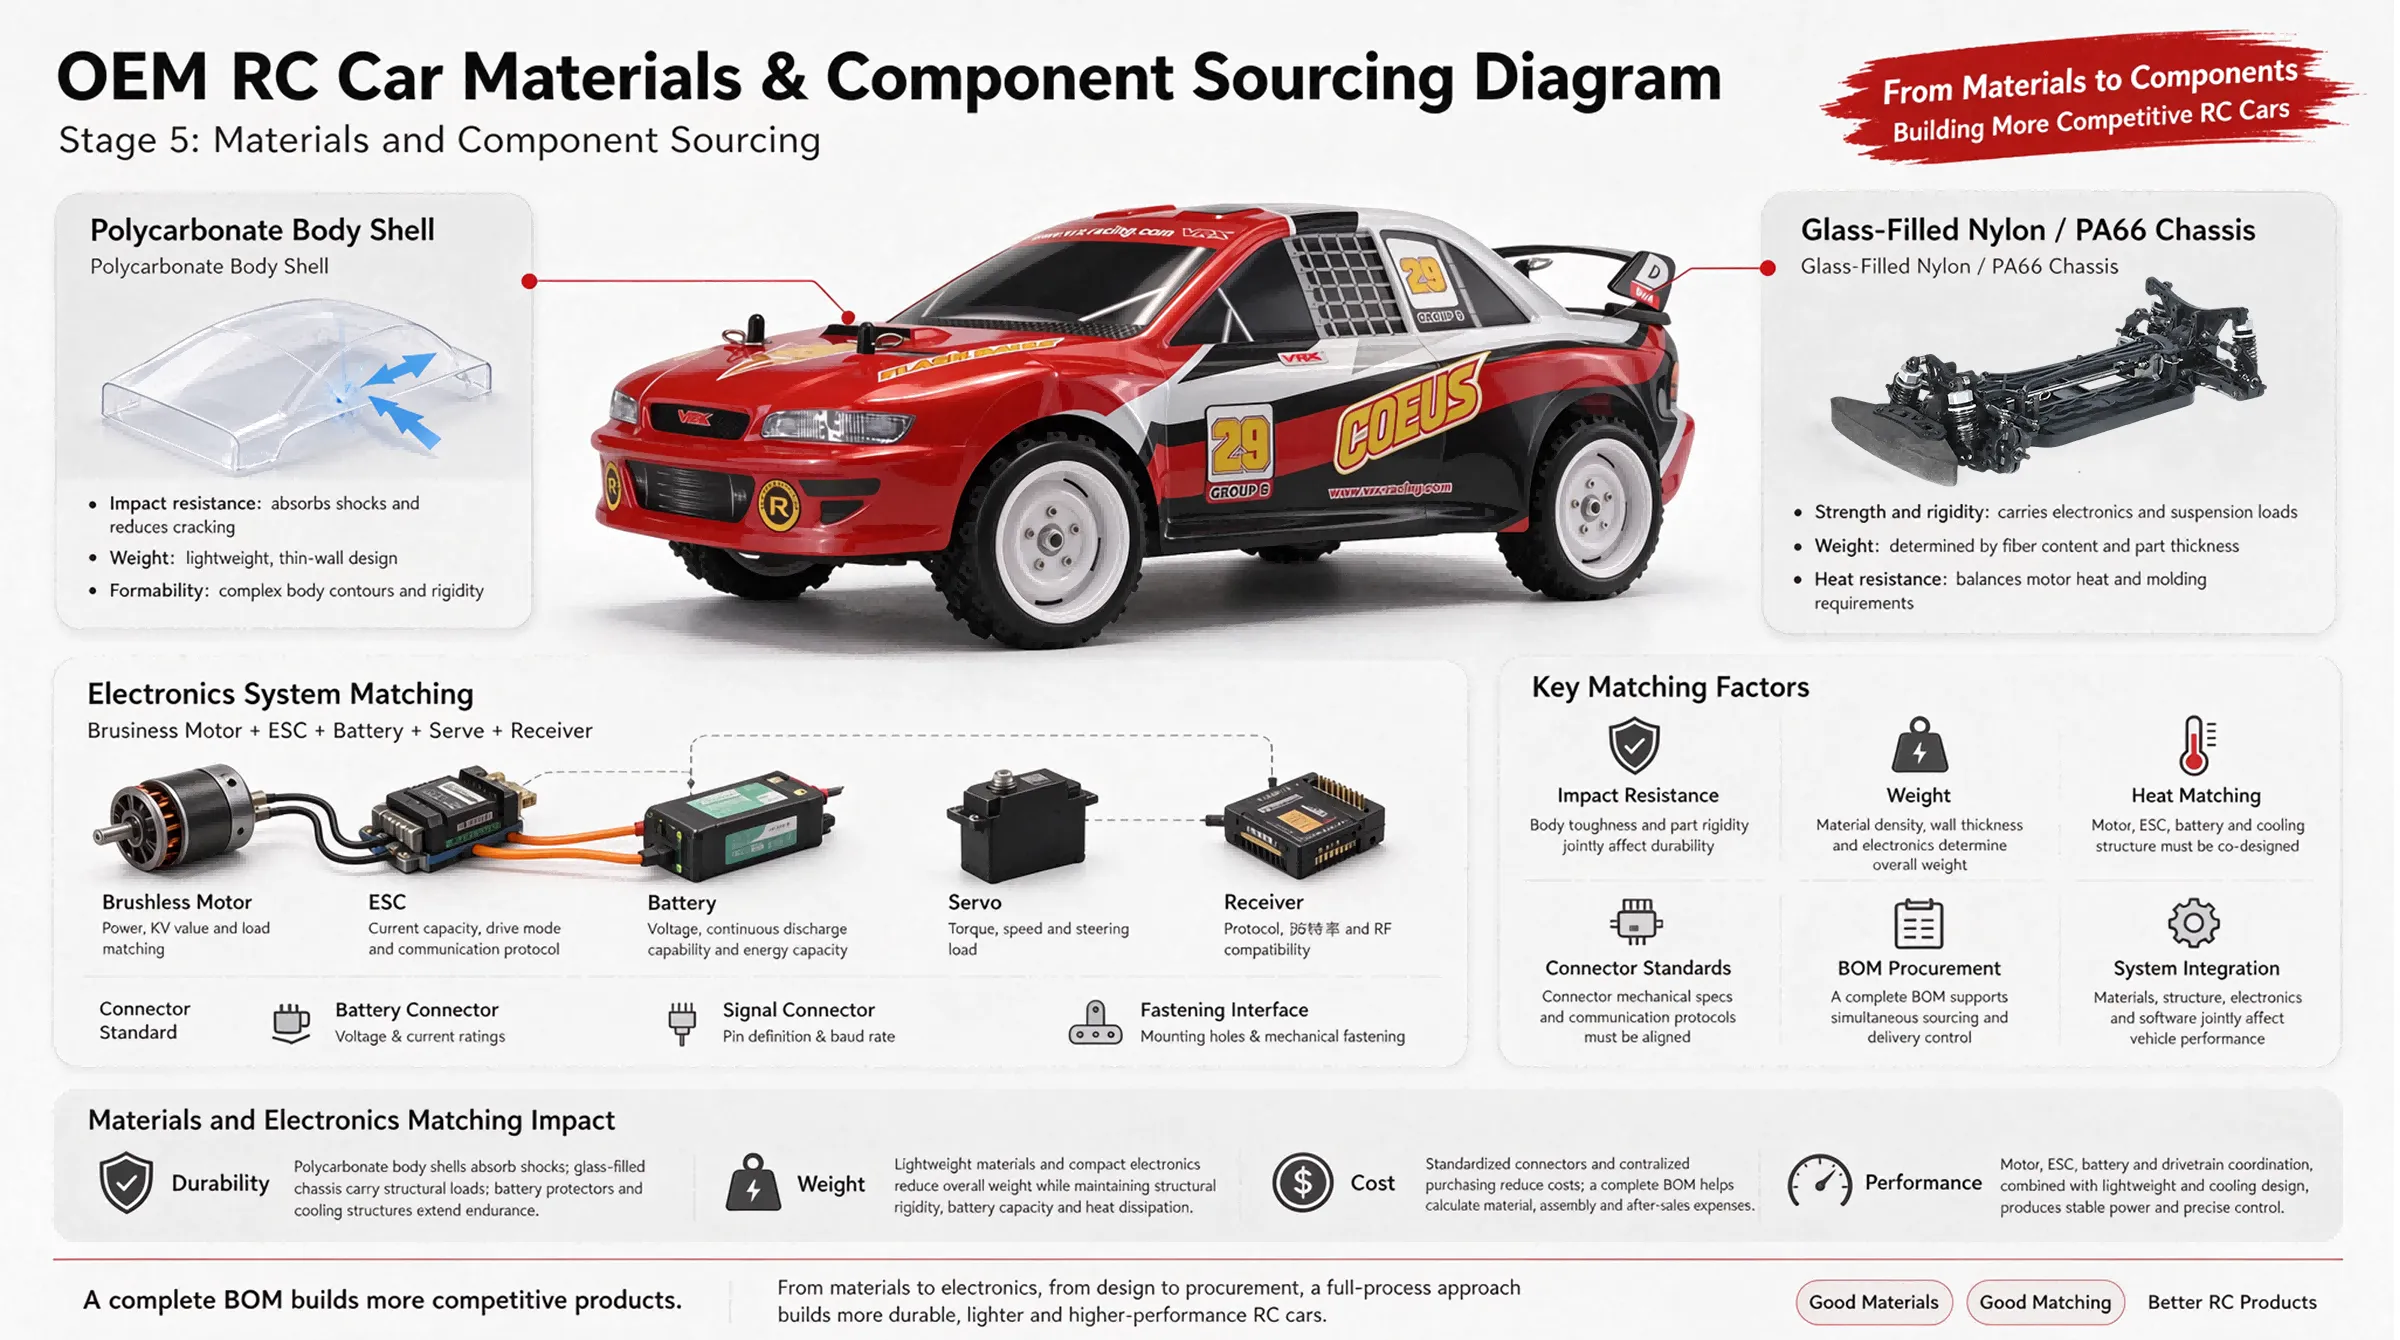
Material selection affects durability, weight, and cost. Polycarbonate is the standard for RC body shells because it offers an excellent balance of flexibility and impact resistance. Chassis components commonly use glass-filled nylon or PA66 engineering plastics.
Electronics sourcing is equally important for OEM projects. The motor, ESC, servo, and receiver must be matched to the vehicle’s weight and intended use. A brushless system paired with an underrated ESC will overheat; a brushed system paired with an oversized battery adds unnecessary weight.
For OEM buyers, the sourcing decision often comes down to whether the factory can supply the complete BOM (bill of materials) or whether some components will be specified by the buyer. Factories with established supply chains can typically offer better pricing and shorter lead times on electronics.
Note that the artwork must be designed for the curved, three-dimensional surface of the body shell, not as flat art.
Key considerations:
Logo legibility from typical viewing angles.
Avoidance of mounting holes and trim lines.
Color accuracy across the production batch.
Compatibility with the chosen finishing process (painted, printed, or decal-applied).
Packaging should be developed in parallel with the vehicle. Retail-ready packaging, localized manuals, and branded accessory inserts all contribute to perceived value. Some manufacturers offer bespoke packaging design as part of the OEM service.
After sample approval, the project moves to a pilot run. This is a small production batch that validates the full manufacturing process—molding, assembly, electronics integration, and quality control—before committing to full-scale output.
The pilot run should be inspected against the approved sample. Any deviation in color, fit, or function is documented and corrected before mass production begins. And the mass production then follows the approved specification. Quality control during this phase typically includes:
Dimensional checks on molded components.
Functional testing of electronics.
Shell-to-chassis fit verification on the assembly line.
Random sampling for drop and impact resistance.
A 1/10 Scale RC Car OEM project might run at a different production tempo than a 1/8 scale nitro platform, but the quality gates remain the same. The factory’s ISO-certified processes should be documented and available for buyer review.
Production is only half of the launch equation. Before the first container ships, several commercial details need resolution:
Final unit pricing and payment terms.
Packaging and labeling compliance for the destination market.
Spare parts availability and initial stocking levels.
Warranty terms and return procedures.
Marketing asset delivery (product photos, specification sheets, video).
For distributors and retailers, spare parts availability is often as important as the vehicle itself. An OEM partner that stocks replacement body shells, differential gears, and suspension arms reduces the after-sales burden on the buyer.
Even well-planned projects encounter setbacks. The most frequent issues include:
Underestimating tooling lead time. Mold making for a new body shell can take several weeks, and revisions extend that timeline further.
Skipping the trial-mold stage. Going directly from CAD to mass production almost always produces fitment problems that could have been caught earlier.
Choosing scale by habit rather than by market fit. A 1/8 scale buggy and a 1/10 scale buggy serve different customer segments, price points, and use cases.
Treating the body shell as an afterthought. The shell interacts with tires, suspension, and electronics. Early integration prevents late-stage redesigns.
Ignoring packaging until production is complete. Retail packaging often has longer lead times than the vehicle itself and should be developed in parallel.
Before releasing an OEM project to mass production, confirm the following:
The development brief is signed off by all stakeholders.
3D design files are approved and archived.
Tooling is complete and first samples have passed inspection.
Graphics and packaging artwork are approved for production.
Electronics configuration is validated under load and thermal stress.
Pilot run output matches the approved sample.
Spare parts plan is defined.
Mass production schedule and shipping timeline are confirmed.
A disciplined development process turns a concept into a product that performs on the shelf and on the track. For buyers working with an experienced RC car manufacturer, the real value is not just the factory’s equipment—it is the project management discipline that keeps each stage on track from idea to launch.